Using Envoy with JWT-SVIDs
Securing Microservice Communication with Envoy Using JWT SPIFFE IDs
This tutorial builds on the SPIRE Envoy-X.509 Tutorial to demonstrate how to use SPIRE to perform JWT SVID authentication on a workload’s behalf instead of X.509 SVID authentication. The changes required to implement JWT SVID authentication are shown here as a delta to that tutorial, so you should run, or at least read through, the X.509 tutorial first.
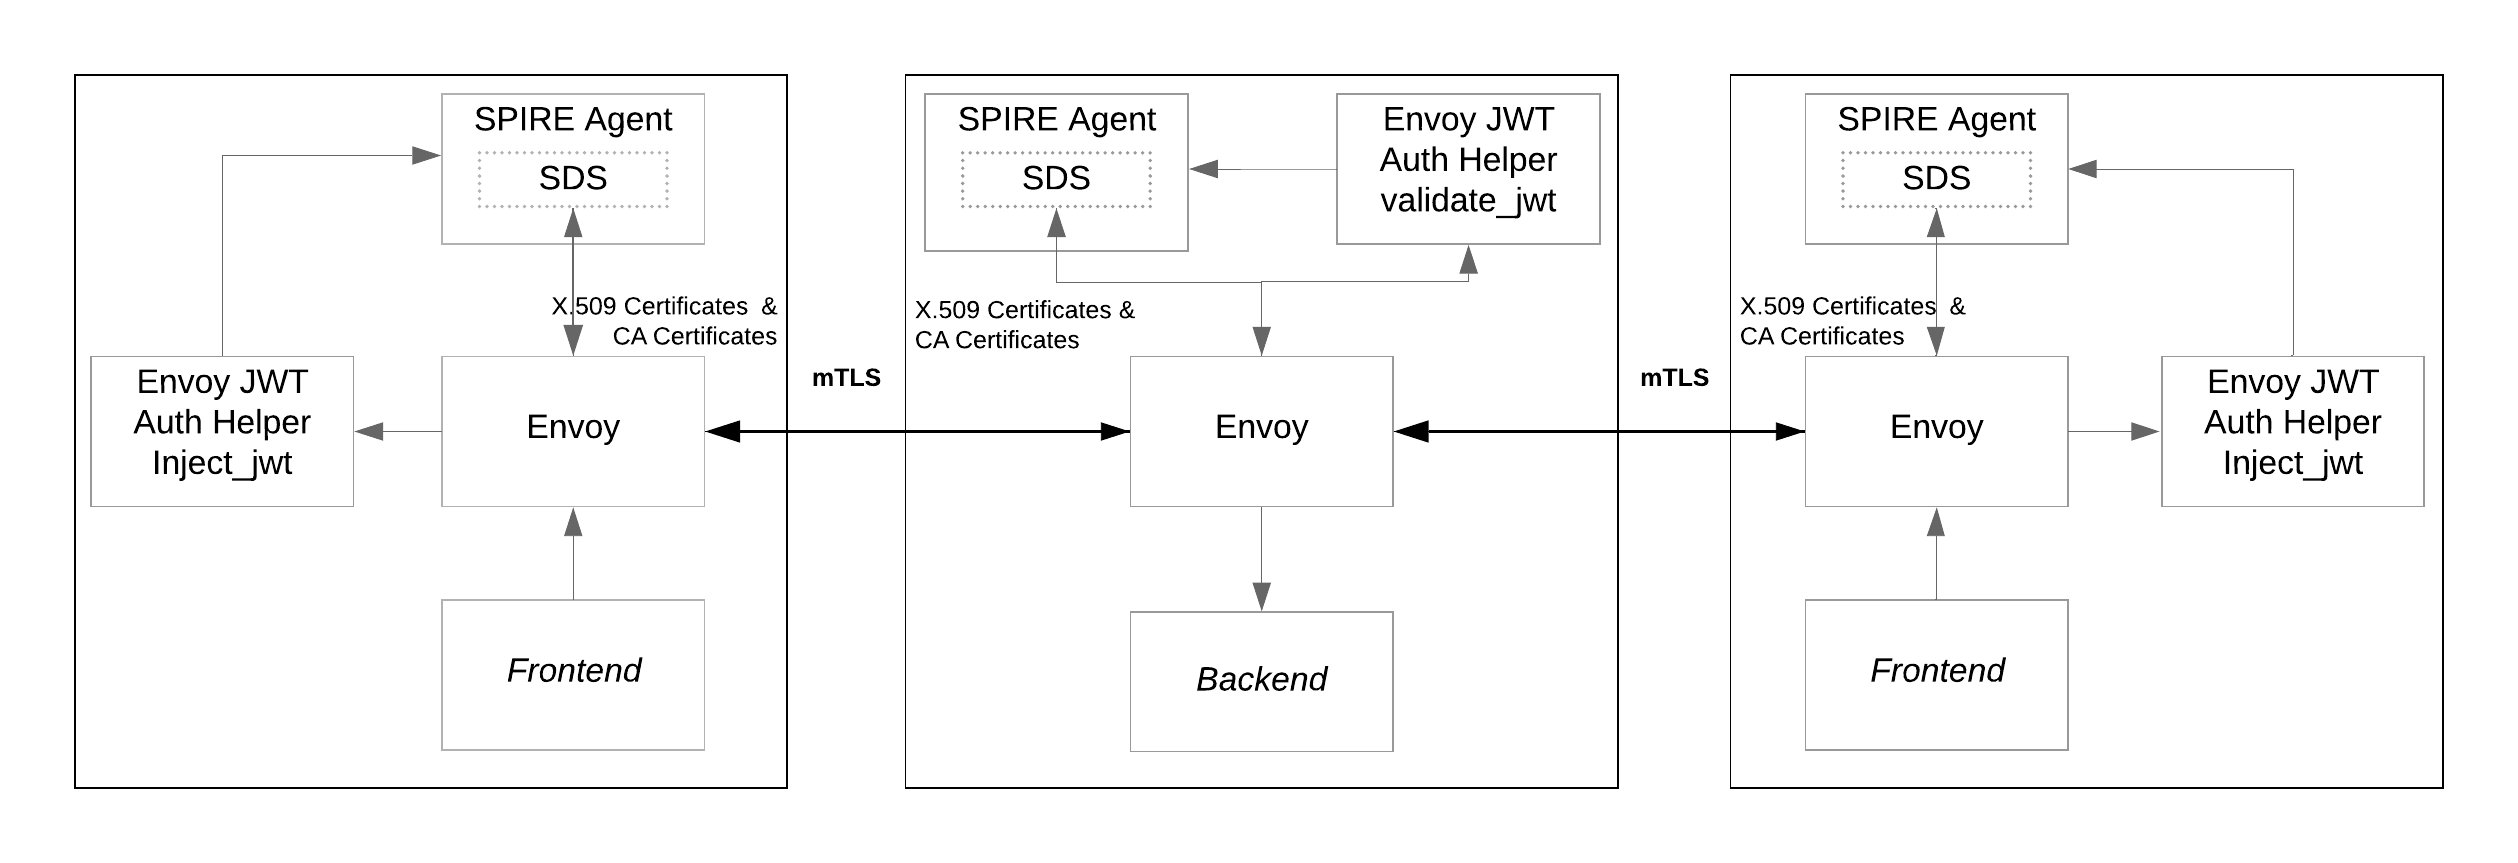
To illustrate JWT authentication, we add sidecars to each of the services used in the Envoy X.509 tutorial. Each sidecar acts as an external authorization filter for Envoy.

As shown in the diagram, the frontend services connect to the backend service via an mTLS connection established by the Envoy instances. Envoy sends HTTP requests through the mTLS connections that carry a JWT-SVID for authentication that is provided and validated by the SPIRE Agent.
In this tutorial you will learn how to:
- Add the Envoy JWT Auth Helper gRPC service to the existing frontend and backend services from the Envoy X.509 tutorial
- Add an External Authorization Filter to the Envoy configuration that connects Envoy to Envoy JWT Auth Helper
- Create registration entries on the SPIRE Server for the Envoy JWT Auth Helper instances
- Test successful JWT authentication using SPIRE
Prerequisites
External IP support
This tutorial requires a LoadBalancer that can assign an external IP (e.g., metallb)
$ kubectl apply -f https://raw.githubusercontent.com/metallb/metallb/v0.13.7/config/manifests/metallb-native.yaml
Wait until metallb has started
$ kubectl wait --namespace metallb-system \
                --for=condition=ready pod \
                --selector=app=metallb \
                --timeout=90s
Apply metallb configuration
$ kubectl apply -f ../envoy-x509/metallb-config.yaml
Auth helper image
An External Authorization filter is implemented using Envoy-jwt-auth-helper,
An script is provided to facilitate building and import using kind or minikube
$ bash ./scripts/build-helper.sh kind
Previous SPIRE instalation
Before proceeding, review the following:
- You’ll need access to the Kubernetes environment configured when going through the SPIRE Envoy-X.509 Tutorial. Optionally, you can create the Kubernetes environment with the
pre-set-env.shscript described just below. - Required YAML files for this tutorial can be found in the
k8s/envoy-jwtdirectory in https://github.com/spiffe/spire-tutorials. If you didn’t already clone the repo for the SPIRE Envoy-X.509 Tutorial please do so now.
If the Kubernetes SPIRE Envoy-X.509 Tutorial environment is not available, you can use the following script to create it and use it as starting point for this tutorial.
From the k8s/envoy-jwt directory, run the following command:
$ bash scripts/pre-set-env.sh
The script will create all the resources needed for the SPIRE Server and SPIRE Agent to be available in the cluster and then will create all the resources for the SPIRE Envoy X.509 tutorial, which is the base scenario for this SPIRE Envoy JWT Tutorial.
Part 1: Deploy Updated and New Resources
Assuming the SPIRE Envoy X.509 Tutorial as a starting point, there are some resources that need to be updated and others must be created. The goal is to have the workloads authenticated via JWT SVIDs. There is an mTLS connection already established between Envoy instances that can be used to transmit JWT SVIDs in request headers. So the missing part is how to obtain the JWT to insert into the request and, on the other side, validate it. The solution applied in this tutorial consists of configuring an external authorization filter on Envoy that, based on a configuration mode, injects or validates JWT SVIDs. Details about this sample server are described in About Envoy JWT Auth Helper.
About Envoy JWT Auth Helper
The Envoy JWT Auth Helper (auth-helper service) is a simple gRPC service that implements Envoy’s External Authorization Filter. It was developed for this tutorial to demonstrate how to inject or validate JWT SVIDs.
For every HTTP request sent to the Envoy forward proxy, Envoy JWT Auth Helper obtains a JWT-SVID from the SPIRE Agent and injects it as a new request header, which is sent to Envoy. On the other side, when the HTTP request arrives at the reverse proxy, the Envoy External Authorization module sends the request to the Envoy JWT Auth Helper which extracts the JWT-SVID from the header and connects to the SPIRE Agent to perform the validation. Once validated, the request is sent back to Envoy. If validation fails, the request is denied.
Internally, Envoy JWT Auth Helper takes advantage of the go-spiffe library which exposes all the necessary functions to fetch and validate JWT SVIDs. Here are the most relevant pieces of code:
// Create options to configure Sources using the Unix domain socket provided by SPIRE.
clientOptions := workloadapi.WithClientOptions(workloadapi.WithAddr(c.SocketPath))

...

// Creates a workloadapi.JWTSource instance to obtain up-to-date JWT bundles from the Workload API.
jwtSource, err := workloadapi.NewJWTSource(context.Background(), clientOptions)
if err != nil {
   log.Fatalf("Unable to create JWTSource: %v", err)
}
defer jwtSource.Close()

...

// Fetches JWT-SVIDs that will be added to a request header.
jwtSVID, err := a.config.jwtSource.FetchJWTSVID(ctx, jwtsvid.Params{
   Audience: a.config.audience,
})
if err != nil {
   return forbiddenResponse("PERMISSION_DENIED"), nil
}

...

// Parse and validate token against fetched bundle from jwtSource.
_, err := jwtsvid.ParseAndValidate(token, a.config.jwtSource, []string{a.config.audience})

if err != nil {
   return forbiddenResponse("PERMISSION_DENIED"), nil
}
Note: workloadapi and jwtsvid are imported from the go-spiffe library.
Update Deployments
The auth-helper service enables Envoy to inject or validate authentication headers carrying a JWT-SVID as described above.
In these sections, YAML file snippets from k8s/backend/config/envoy.yaml illustrate the required changes needed to add JWT authentication to the backend service defined in the SPIRE Envoy-X.509 Tutorial. Other YAML files apply these same changes to the other two services (frontend and frontend-2) but these changes are not described in the text to avoid needless repetition. You don’t have to make these changes manually to the YAML files. The new files are included in the k8s/envoy-jwt/k8s directory.
This new auth-helper service must be added as a sidecar and must be configured to communicate with the SPIRE Agent. This is achieved by mounting a volume to share the Unix domain socket the SPIRE Agent provides. A new second volume provides access to the configmap defined with the service configuration. The following snippet, from the containers section, describes these changes:
- name: auth-helper
  image: envoy-jwt-auth-helper:latest
  imagePullPolicy: IfNotPresent
  args:  ["-config", "/run/envoy-jwt-auth-helper/config/envoy-jwt-auth-helper.conf"]
  ports:
  - containerPort: 9010
  volumeMounts:
  - name: envoy-jwt-auth-helper-config
    mountPath: "/run/envoy-jwt-auth-helper/config"
    readOnly: true
  - name: spire-agent-socket
    mountPath: /run/spire/sockets
    readOnly: true
The spire-agent-socket volume is already defined for the deployment, no need to add it again. The configmap envoy-jwt-auth-helper-config needs to be added into the volumes section, like this:
- name: envoy-jwt-auth-helper-config
  configMap:
     name: be-envoy-jwt-auth-helper-config
Add an External Authorization Filter
Next, this setup requires an External Authorization Filter in the Envoy configuration that connects to the new service. This new HTTP filter calls the auth-helper service just added to the deployment:
http_filters:
- name: envoy.filters.http.ext_authz
  typed_config:
    "@type": type.googleapis.com/envoy.extensions.filters.http.ext_authz.v3.ExtAuthz
    transport_api_version: V3
    grpc_service:
      envoy_grpc:
        cluster_name: ext-authz
      timeout: 0.5s
Here’s the corresponding cluster configuration for the External Authorization Filter:
- name: ext-authz
  connect_timeout: 1s
  type: strict_dns
  http2_protocol_options: {}
  load_assignment:
    cluster_name: ext-authz
    endpoints:
    - lb_endpoints:
      - endpoint:
          address:
            socket_address:
              address: 127.0.0.1
              port_value: 9010
Apply the New Resources
The services need to be redeployed for the new configuration to take effect. Let’s remove the backend and frontend deployments so we can update them:
$ kubectl delete deployment backend
$ kubectl delete deployment frontend
Ensure that the current working directory is .../spire-tutorials/k8s/envoy-jwt and deploy the new resources using:
$ kubectl apply -k k8s/.

configmap/backend-envoy configured
configmap/be-envoy-jwt-auth-helper-config created
configmap/fe-envoy-jwt-auth-helper-config created
configmap/frontend-envoy configured
deployment.apps/backend configured
deployment.apps/frontend configured
Create Registration Entries
In order to fetch or validate JWT SVIDs issued by SPIRE, the auth-helper instances need to be authenticated on the SPIRE Server. We can achieve this by creating registration entries for each of them using the following Bash script:
$ bash create-registration-entries.sh
Once the script is run, the list of new registration entries will be shown.
...
Creating registration entry for the backend - auth-server...
Entry ID      : ecb140ab-50a7-4590-9fe0-d715ada67f29
SPIFFE ID     : spiffe://example.org/ns/default/sa/default/backend
Parent ID     : spiffe://example.org/ns/spire/sa/spire-agent
TTL           : 3600
Selector      : k8s:ns:default
Selector      : k8s:sa:default
Selector      : k8s:pod-label:app:backend
Selector      : k8s:container-name:auth-helper

Creating registration entry for the frontend - auth-server...
Entry ID      : 59a127fa-328c-4115-883e-5ee20b86714f
SPIFFE ID     : spiffe://example.org/ns/default/sa/default/frontend
Parent ID     : spiffe://example.org/ns/spire/sa/spire-agent
TTL           : 3600
Selector      : k8s:ns:default
Selector      : k8s:sa:default
Selector      : k8s:pod-label:app:frontend
Selector      : k8s:container-name:auth-helper
...
Note that the selectors for the new services point to the auth-helper container: k8s:container-name:auth-helper. This is necessary to authenticate the service into SPIRE so it can fetch or validate the JWT SVIDs configured as an authentication header for every request.
Intentionally, there is no registration entry for the frontend-2 service. It will be added later to demonstrate that requests are denied by the external authorization filter when a JWT-SVID is not present in the request header.
Part 2: Test Connections
Now that services are deployed and also registered in SPIRE, let’s test the authorization that we’ve configured.
Testing for Valid and Invalid JWT-SVIDs
The first set of testing will demonstrate how valid JWT-SVIDs allow for the display of associated data and invalid JWT-SVIDs prevent the associated data from being displayed. To run these tests, we need to find the IP addresses and ports that make up the URLs to use for accessing the data.
$ kubectl get services

NAME            TYPE           CLUSTER-IP    EXTERNAL-IP      PORT(S)          AGE
backend-envoy   ClusterIP      None            <none>           9001/TCP         10m
frontend        LoadBalancer   10.96.226.176   172.18.255.200   3000:32314/TCP   10m
frontend-2      LoadBalancer   10.96.33.198    172.18.255.201   3002:31797/TCP   10m
kubernetes      ClusterIP      10.96.0.1       <none>           443/TCP          55m
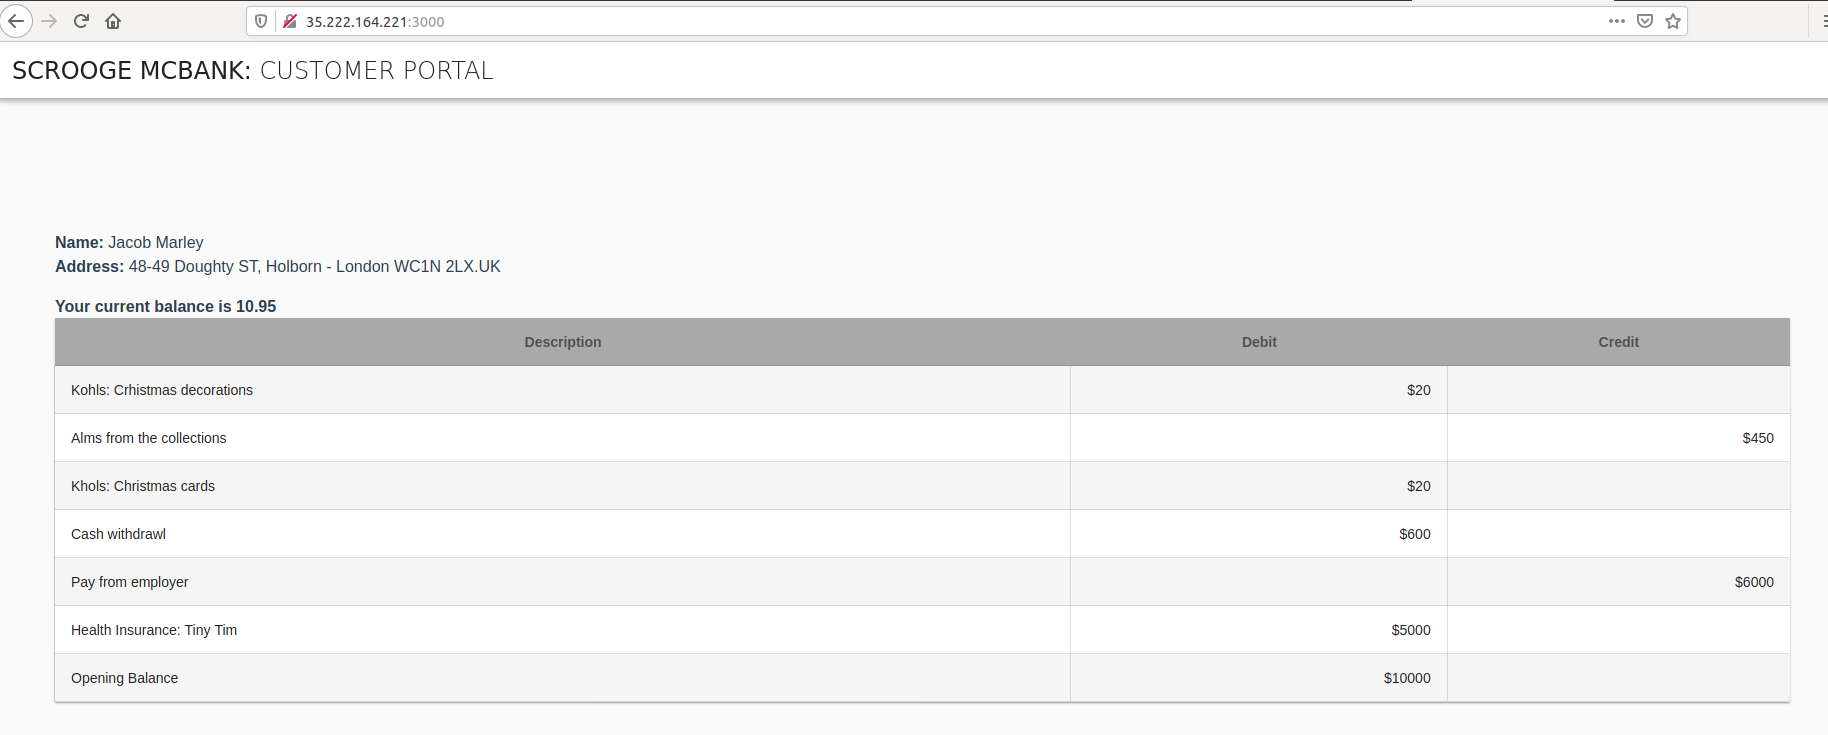
The frontend service will be available at the EXTERNAL-IP value and port 3000, which was configured for our container. In the sample output shown above, the URL to navigate is http://172.18.255.200:3000. Open your browser and navigate to the IP address shown for frontend in your environment, adding the port :3000. Once the page is loaded, you’ll see the account details for user Jacob Marley.

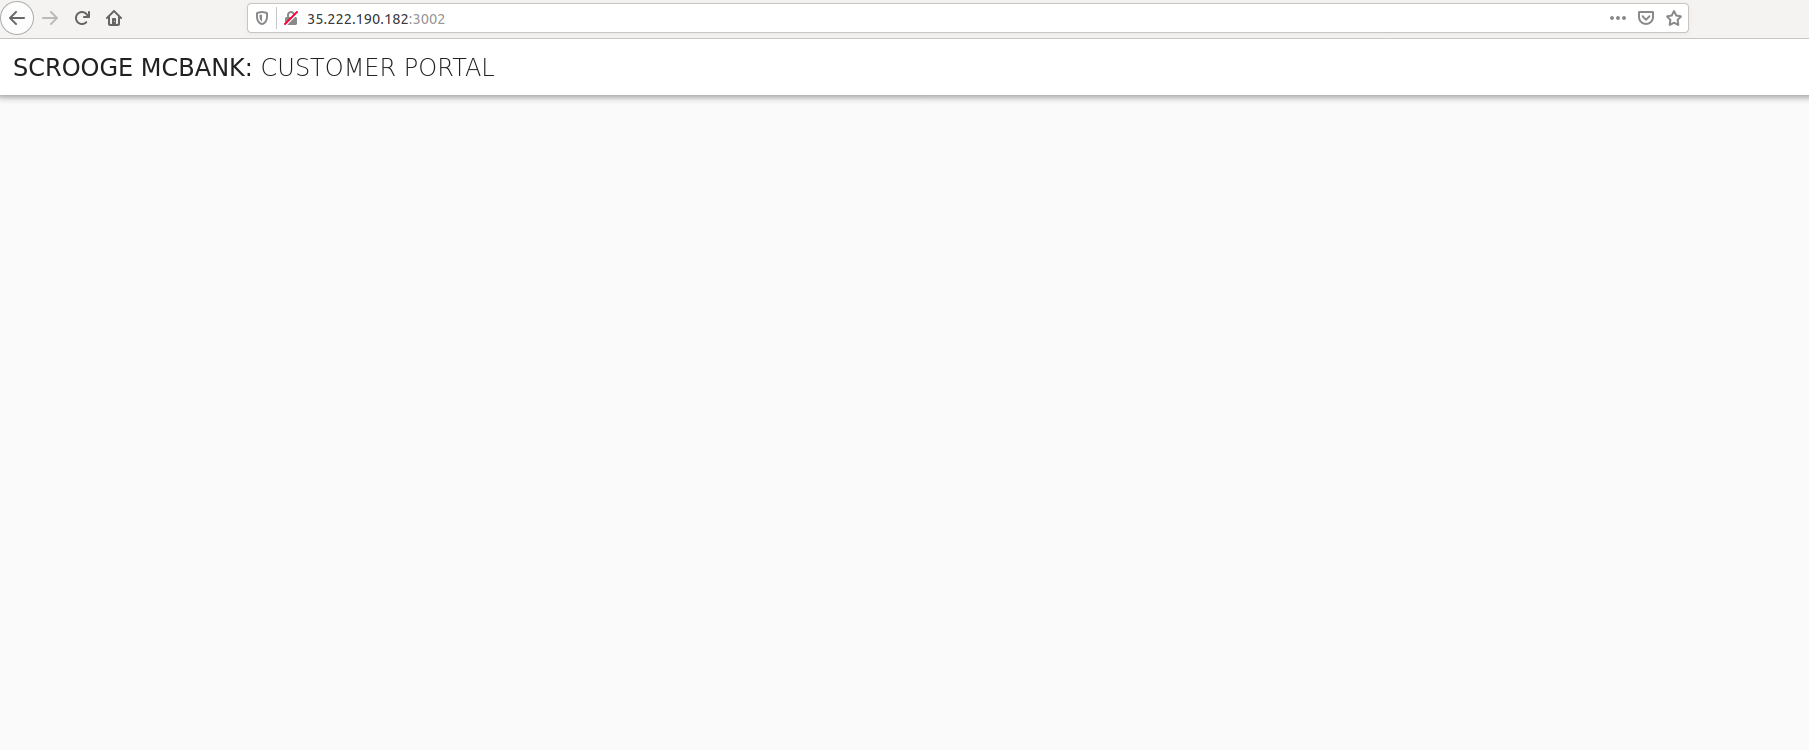
On the other hand, when you connect to the URL for the frontend-2 service (e.g. http://172.18.255.201:3002), the browser only displays the title without any account details. This is because the frontend-2 service was not updated to include a JWT token in the request. The lack of a valid token on the request makes the Envoy instance in front of the backend reject it.

Let’s take a look at the auth-helper container logs to see what is happening behind the scenes. The following are the logs for the auth-helper instance running next to the frontend service. In this case, the auth-helper server is configured to run in inject mode. For every request, it will inject the JWT-SVID as a new request header and return it to the Envoy instance that will forward it to the backend.
$ kubectl logs -f --selector=app=frontend -c auth-helper
Envoy JWT Auth Helper running in jwt_injection mode
Starting gRPC Server at 9011
JWT-SVID injected. Sending response with 1 new headers
JWT-SVID injected. Sending response with 1 new headers
JWT-SVID injected. Sending response with 1 new headers
On the other side, the auth-helper instance running in front of the backend service is configured to run in validation mode so it will check the JWT-SVID in the request headers. It extracts the token and validates it. In this case the token is valid for the first three requests which are then sent back to the Envoy instance. These requests are from the frontend service.
$ kubectl logs -f --selector=app=backend -c auth-helper
Envoy JWT Auth Helper running in jwt_svid_validator mode
Starting gRPC Server at 9010
Token is valid
Token is valid
Token is valid
Invalid or unsupported authorization header: []
Invalid or unsupported authorization header: []
Invalid or unsupported authorization header: []
When the requests comes from the frontend-2 service (the last 3 logs entries), auth-helper is not able to obtain a JWT-SVID from the request and denied it. This is why account details are not shown in your browser for the frontend-2 service.
Retesting frontend-2 with a Valid JWT-SVID
To enable successful JWT-SVID authentication for frontend-2, we’ll update the Kubernetes environment so frontend-2 has a similar setup as frontend. This includes a new container for the auth_helper service, a new configmap for auth-helper, and an updated frontend-2-envoy configmap with the external authorization filter.
Let’s delete the frontend-2 deployment in preparation for the new configuration.
$ kubectl delete deployment frontend-2
To update the Envoy configuration and the service deployment for frontend-2 use the k8s/frontend-2/kustomization.yaml file:
$ kubectl apply -k k8s/frontend-2/.

configmap/fe-2-envoy-jwt-auth-helper-config created
configmap/frontend-2-envoy configured
deployment.apps/frontend-2 created
Next, authenticate the new auth-helper service in SPIRE Server by creating a new registration entry for it:
$ bash k8s/frontend-2/create-registration-entry.sh

Creating registration entry for the frontend-2 - auth-server...
Entry ID      : bd0acd51-0d36-42be-8999-fccdcf1f33da
SPIFFE ID     : spiffe://example.org/ns/default/sa/default/frontend-2
Parent ID     : spiffe://example.org/ns/spire/sa/spire-agent
TTL           : 3600
Selector      : k8s:ns:default
Selector      : k8s:sa:default
Selector      : k8s:pod-label:app:frontend-2
Selector      : k8s:container-name:auth-helper
Wait some seconds for the deployment to propagate before trying to view the frontend-2 service in your browser again.
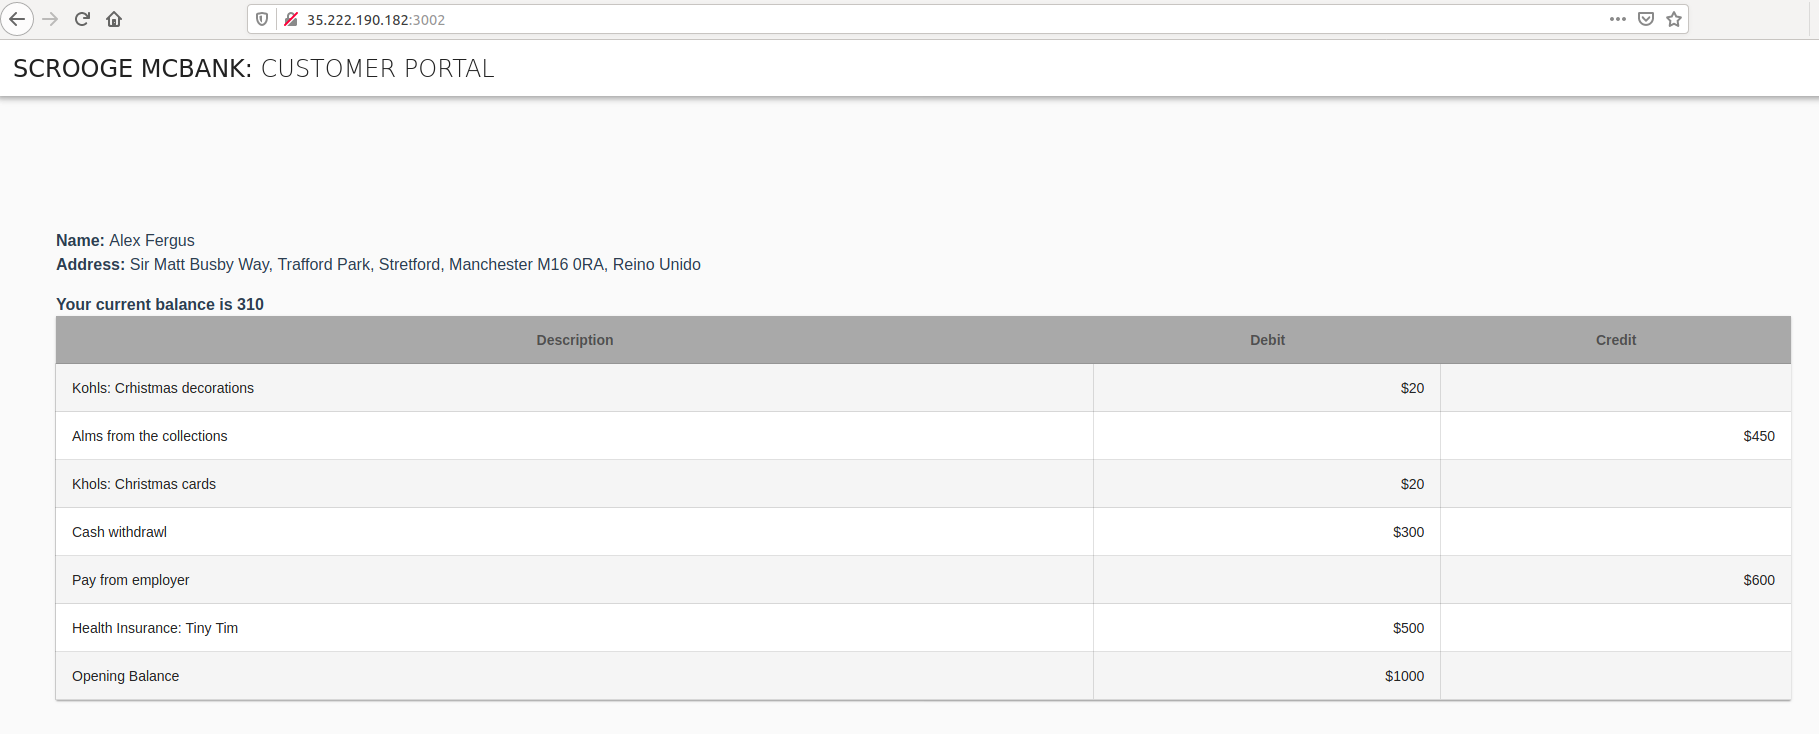
Once the pod is ready and the registration entry is propagated, refresh the browser using the correct URL for the frontend-2 service (e.g. http://35.222.190.182:3002). As a result, now the page shows the account details for user Alex Fergus.

Cleanup
When you are finished running this tutorial, you can use the following command to remove all the resources used for configuring Envoy to perform JWT SVID authentication on a workload’s behalf. This command will remove:
- All resources created for this SPIRE - Envoy JWT integration tutorial.
- All resources created for the SPIRE - Envoy X.509 integration tutorial.
- All deployments and configurations for the SPIRE agent, SPIRE server, and namespace.
$ bash scripts/clean-env.sh
